<세팅목록>
1. 디렉토리/파일목록 세팅
2. Git 세팅
3. 라이브러리 세팅
4. node서버와 react 연결, 프록시 개발환경 설정
5. 디렉토리에 따른 코드분할과 라우터설계 // 오늘 여기부터
6. DB세팅 // 여기까지
7. 로그세팅
...
5. 디렉토리에 따라 코드 분할하기

5-1. flowChart로 이해하기
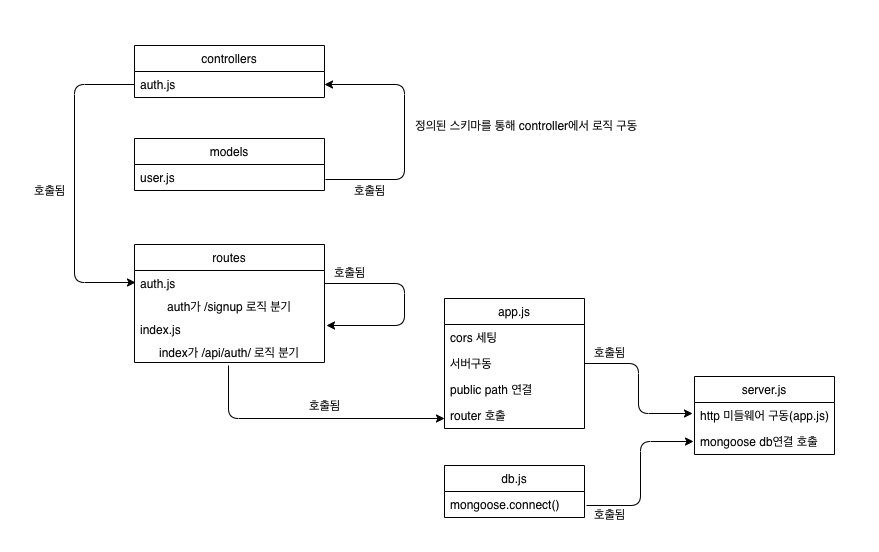
- models 에서 정의된 스키마를 이용하여 controllers에서 컨트롤 로직을 구현하고,
- routes의 index.js 가 /api/auth까지 정의해주면 그 이후 depth는 auth.js에서 /api/auth/signup 처럼 정의한다.
- app.js에서 router를 호출하여 정의하고 미들웨어를 쑤셔넣는다.
- server.js는 실행만 해준다.
- 다음은 mongoDB에 연결하여 userID, name, userPassword를 post처리해서 db에 추가가 되는지 테스트해본다.
5-2. 예제코드보기
/controllers/auth.js
const User = require('../models/user'); //user스키마 가져온다

const createUserData = async(userInput)=>{ //db에 저장하는 함수
    const user = await userWithEncoded(userInput);
    return user.save(); //db에 저장
}

const userWithEncoded = ({userID, name, userPassword})=>{ //암호화
    //여기에 암호화로직 추가
    const user = new User({userID, name, userPassword}); //schema에 집어넣기
    return user
}

const signUp = async (req, res)=>{
    try{
        const {userID} = req.body;
        //여기에 db에서 id 찾아서 중복검사 해주는 로직 추가
        await createUserData(req.body);
        res.status(201).send('생성 success!')
    }
    catch(err){
        res.send(err)
    }
}

module.exports = {signUp};
models/user.js
const mongoose = require('mongoose');
const Schema = mongoose.Schema;

const userSchema = new Schema({
    userID: {
        type: String,
        required: true
    },
    name : {
        type:String,
        required: true
    },
    userPassword :{
        type:String,
        required:true
    }
},
{versionKey : false}
);

module.exports = mongoose.model('User', userSchema);
/routes/auth.js
const express = require('express');
const router = express.Router();

const {signUp} = require('../controllers/auth');

router.post('/signup',signUp) // /api/auth/signup

module.exports = router;
/routes/index.js
const authRoutes = require('./auth');

const router = (app)=>{
    app.use('/api/auth', authRoutes) // api/auth/ ~
}
module.exports = router;
app.js
const express = require('express');
const app = express();
const router = require('./routes');
const path = require('path');

// body-parser setting
const bodyParser = require('body-parser');
app.use(bodyParser.urlencoded({extended : true}));
app.use(bodyParser.json());

//environment variables setting
require('dotenv').config();
const ENV = process.env;

// cors setting
const cors = require('cors');
let corsOption = {
    origin: `http://localhost:${ENV.PORT}`, // 허용 주소
    credentials: true  // true시 설정 내용을 응답헤더에 추가해 줌
}
app.use(cors(corsOption)); // CORS 미들웨어 추가

app.use(express.static(path.join(__dirname, 'public'))) // static path 미들웨어

router(app);

module.exports = app;
db.js
const mongoose = require("mongoose");
const dotenv = require("dotenv").config();
mongoose.set('strictQuery', false);
module.exports = mongoose.connect(process.env.DB_URL, { //.env파일에 DB_URL적어둔 것
  useNewUrlParser: true,
  useUnifiedTopology: true,
  // useFindAndModify: false,
  // useCreateIndex: true,
}, ()=>{console.log('연결되었습니다 db.js')});
server.js
const app = require('./app');
const http = require('http');
const mongoose = require('./db');


const server = http.createServer(app);

const nowServer = async ()=>{
    try{
        await mongoose;
        server.listen(process.env.PORT, ()=>{
            console.log('server.js에서'+process.env.PORT)
        })
    }
    catch(e){
        console.log('DB에러다'+e)
    }
}

nowServer();
6. DB연동
- mongoDB atlas에 가입한다
- collection 만들고 overview탭에서 connect 누른다
- connect your application 눌러서 주소 복사해온다
- 중간에 password 라고 된 부분에 비밀번호 넣고 .env파일에 넣어준다 ( DB_URL = '주소' 이런식으로)
- 비밀번호가 명시되있으므로 공유 및 배포 시 주의한다.
- 모르겠으면 구글링하면 된다.
6-1. frontend에서 post요청으로 테스트
/frontend/App.js
import axios from 'axios';
import './App.css';

function App() {
  const testAPI = ()=>{
    axios.post('api/auth/signup',{userID:'테스트아이디이다', name:'빅터', userPassword:'0네개국룰'})
    .then((res)=>{
      console.log(res.data);
    })
    .catch((e)=>{
      console.log(e)
    })
  }

  return (
    <div className="main">
      Hello World !
      <button onClick={testAPI}>
    where is my button
      </button>
    </div>
  );
}

export default App;
- 이제 버튼을 눌러보면

- 근데 끝이 아니다. db 확인해야한다.

- 연결까지 끝!
- git push 잊지말자.
'더이상 하지 않는 망한 프로젝트 > 프로젝트 개발 과정' 카테고리의 다른 글
| [앱삼] 4. (frontend) Redux-toolkit 구조 세팅 (0) | 2023.03.02 |
|---|---|
| [앱삼] 3. DB연결 구조 개선하기 (0) | 2023.02.27 |
| [앱삼] 2. MERN 풀스택 환경 기본세팅 - 4 (0) | 2023.02.26 |
| [앱삼] 2. MERN 풀스택 환경 기본세팅 - 3 (0) | 2023.02.26 |
| [앱삼] 2. MERN 풀스택 환경 기본 세팅 - 1 (0) | 2023.02.26 |


댓글